Visual Basic offers a neat way to achieve this goal. In fact, all you have to do is write some statements in the Class_Initialize event of the class module. To have the editor create a template for this event procedure, you select the Class item in the leftmost combo box in the code editor. Visual Basic automatically selects the Initialize item from the rightmost combo box control and inserts the template into the code window. Here’s a Citizenship property that defaults to "American":
‘ The Private member variable
Private m_Citizenship As String
Private Sub Class_Initialize()
m_Citizenship = "American"
End Sub
‘ Code for Public Property Get/Let Citizenship procedure ... (omitted)
If you now run the program you have built so far and trace through it, you’ll see that as soon as Visual Basic creates the object (the Set command in the form module), the Class_Initialize event fires. The object is returned to the caller with all the properties correctly initialized, and you don’t have to assign them in an explicit way. The Class_Initialize event has a matching Class_Terminate event, which fires when the object instance is destroyed by Visual Basic. In this procedure, you usually close your open files and databases and execute your other cleanup tasks. I will describe the Class_Terminate event at the end of this chapter.
Debugging a class module
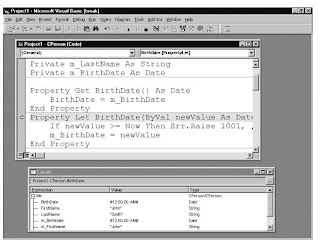
In most respects, debugging code inside a class module isn’t different from debugging code in, say, a form module. But when you have multiple objects that interact with one another, you might easily get lost in the code. Which particular instance are you looking at in a given moment? What are its current properties? Of course, you can use all the usual debugging tools—including Debug.Print statements, data tips, Instant Watch, and so on. But the one that beats them all is the Locals window, which you can see in the following Figure . Just keep this window open and you’ll know at every moment where you are, how your code affects the object properties, and so on. All in real time.

The Me keyword
Sometimes a class must reference itself in code. This is useful, for instance, when an object must pass a reference to itself to another routine. This can be done using the Me keyword. In the following sample code, I have prepared a couple of general-purpose routines in a BAS module, which help keep track of when an object is created and destroyed:
‘ In a Standard BAS module
Sub TraceInitialize (obj As Object)
Debug.Print "Created a " & TypeName(obj) _
& " object at time " & Time$
End Sub
Sub TraceTerminate (obj As Object)
Debug.Print "Destroyed a " & TypeName(obj) _
& " object at time " & Time$
End Sub
Here’s how you use these routines from within the CPerson class module:
Private Sub Class_Initialize()
TraceInitialize Me
End Sub
Private Sub Class_Terminate()
TraceTerminate Me
End Sub
Properties, Methods, and Events
It’s time to see how you can put all the capabilities you’ve seen so far to good use
Read-Only and Write-Only Properties
If you look at how Visual Basic defines its own objects (forms, controls, and so on), you’ll notice that not all properties can be both read from and written to. For example, you can’t modify the MultiSelect property of a ListBox control at run time, and you can’t modify the height of a ComboBox control even at design time. Depending on the nature of your class, you might have many good reasons to limit the access to your properties, making them read-only or (less frequently) write-only.
Read-only properties
Say that you want to add an Age property to your CPerson class. It depends on the BirthDate property, so it should be a read-only property. In Visual Basic, you can make a property read-only by simply omitting its Property Let procedure:
Property Get Age() As Integer
Age = Year(Now) - Year(BirthDate)
End Property
To prove that you now have a read-only property, try to execute this code:
pers.Age = 50
The Visual Basic compiler traps this logical error as soon as you try to run your program and won’t compile the program until you correct or delete the statement.
Write-only properties
Occasionally, you might even want to create write-only properties. A typical example is a Password property exposed by an imaginary LoginDialog object. The property can be assigned to validate the login process but shouldn’t be readable so as not to compromise the security of the application itself. In Visual Basic, such a write-only property can be easily implemented by writing a Property Let procedure while omitting the corresponding Property Get routine:
Private m_Password As String
Property Let Password(ByVal newValue As String)
‘ Validate the password, raise error if not valid.
‘ ...
‘ If all is OK, assign to Private member variable.
m_Password = newValue
End Property
Write-only properties are often confusing and are perceived as unnatural by most developers. If need dictates a write-only property, I prefer to create a method that accepts the value as an argument (SetPassword, in this particular example).

No comments:
Post a Comment